Visits & Forms Workflow
- Completing GAS assessment forms - Goal-Setting and Follow-up Rating GAS Assessment Forms
- Intelligent GAS Guidance Tooltips
- Exceptions to the Goal-Setting GAS Assessment Form due to Visit Schedule
- Completing GAS Assessment Rating Forms during Follow-up Visits
- Unscheduled Visits (e.g., Withdrawal)
Completing GAS assessment forms - Goal-Setting and Follow-up Rating GAS Assessment Forms
In this section, we will demonstrate how to access GAS assessment forms within a visit, how to complete a goal-setting GAS assessment form, and a follow-up rating GAS assessment form.
There should be no personally identifiable information (PII) or personal healtl information (PHI) entered into GoalNav for any reason. Reviewing your data prior to saving the form can ensure that no PII or PHI was accidentally added in as free text.
Completing a Goal-Setting GAS Assessment Form
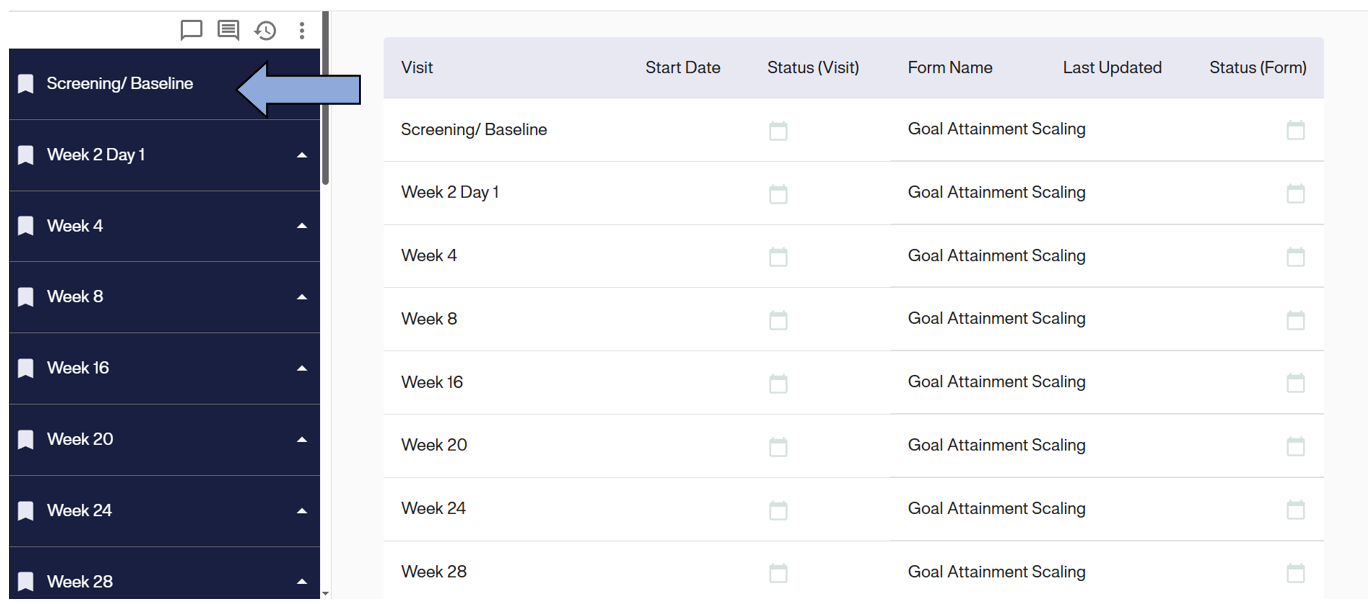
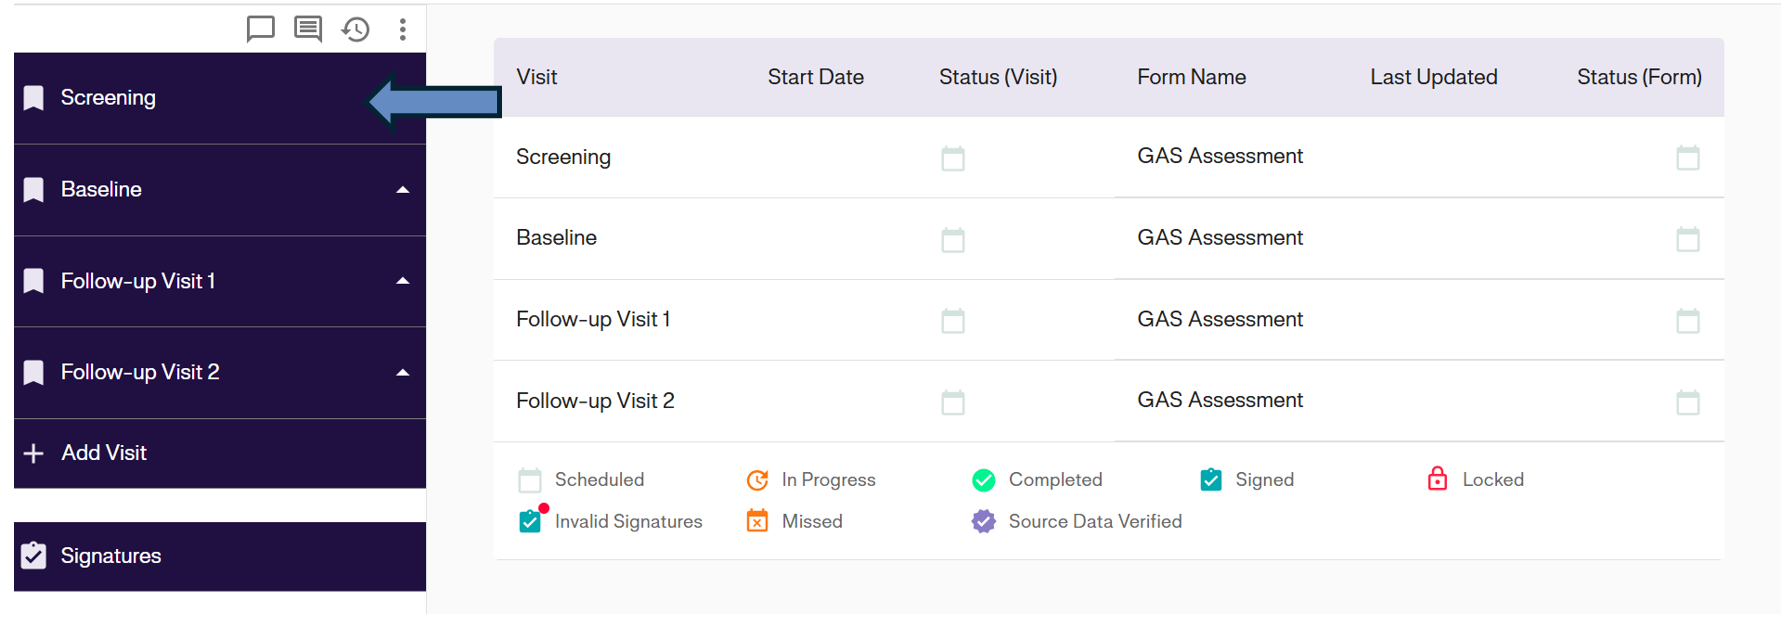
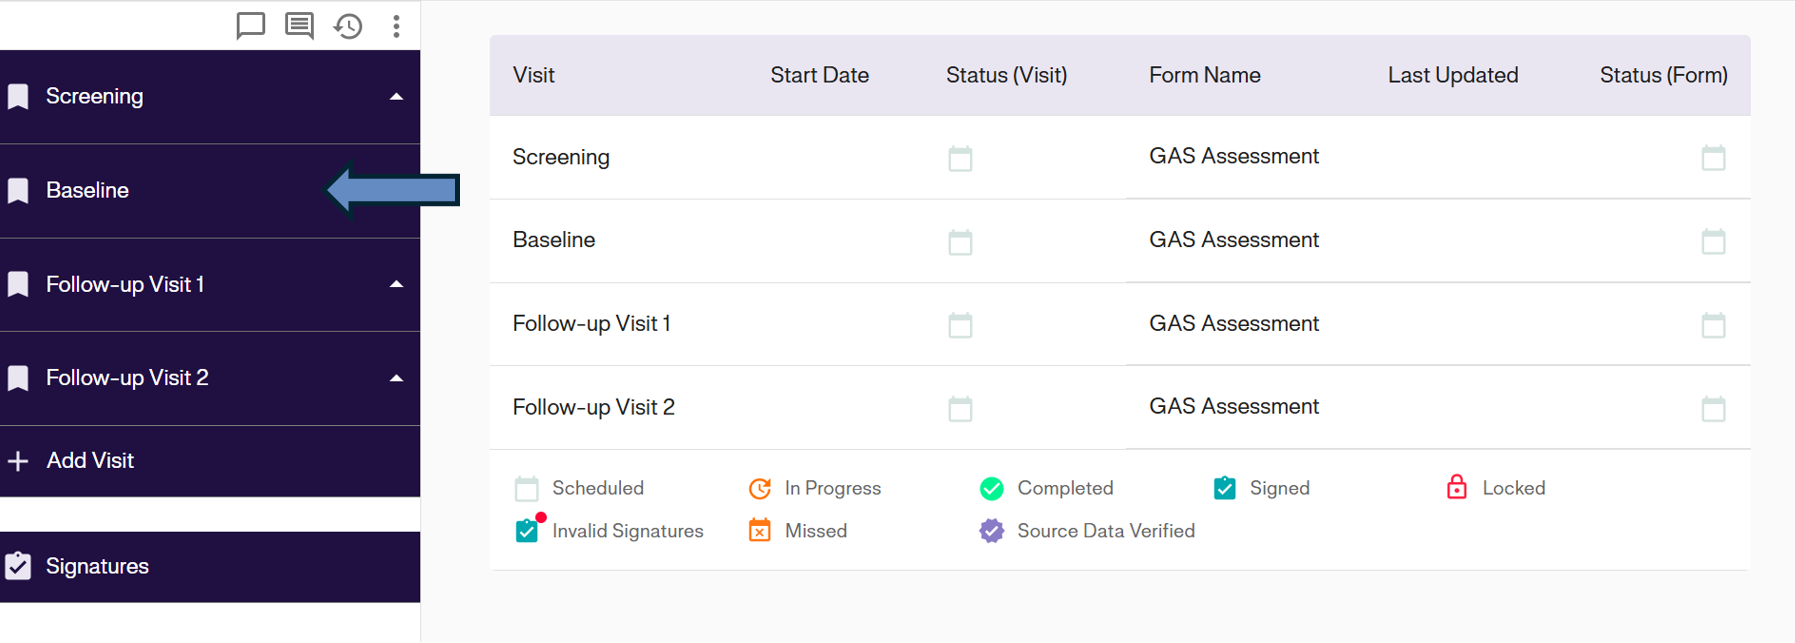
In this example, we are demonstrating how to complete a goal-setting visit GAS assessment form that’s documented for a Baseline visit. Each study visit is accessed through the study menu on the left side of the Subject details page.
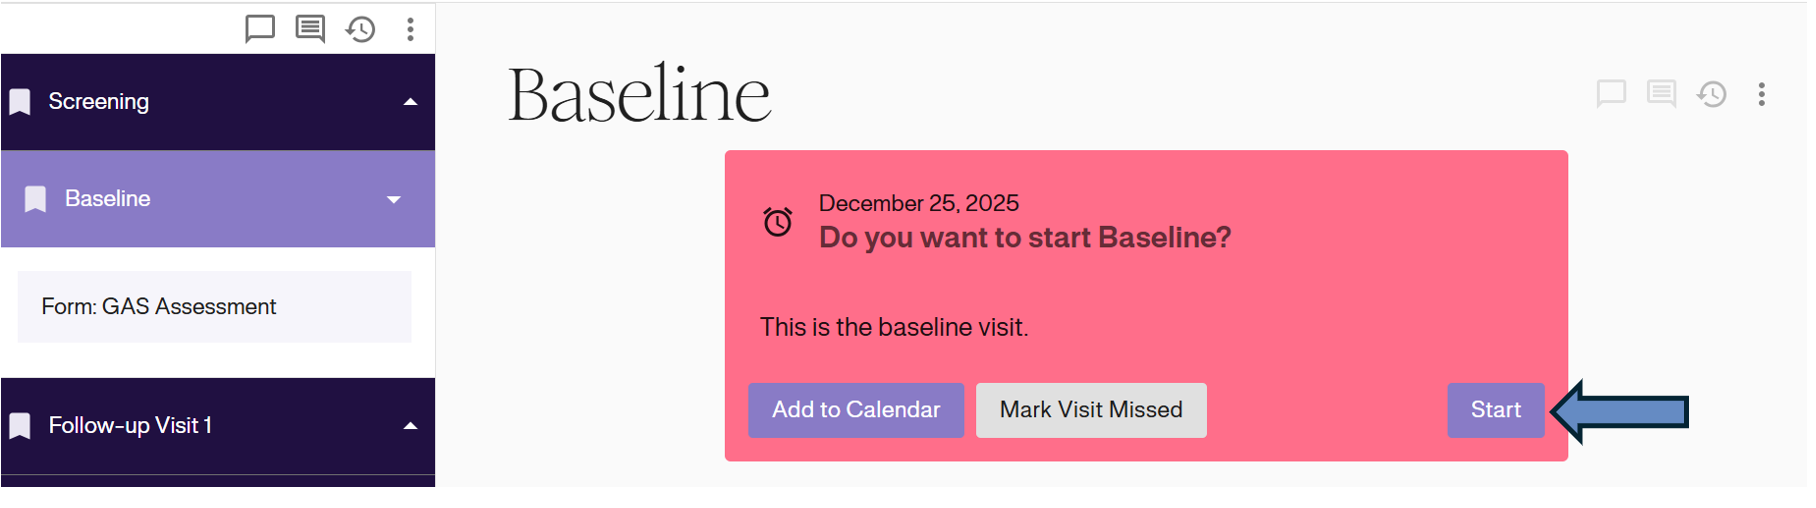
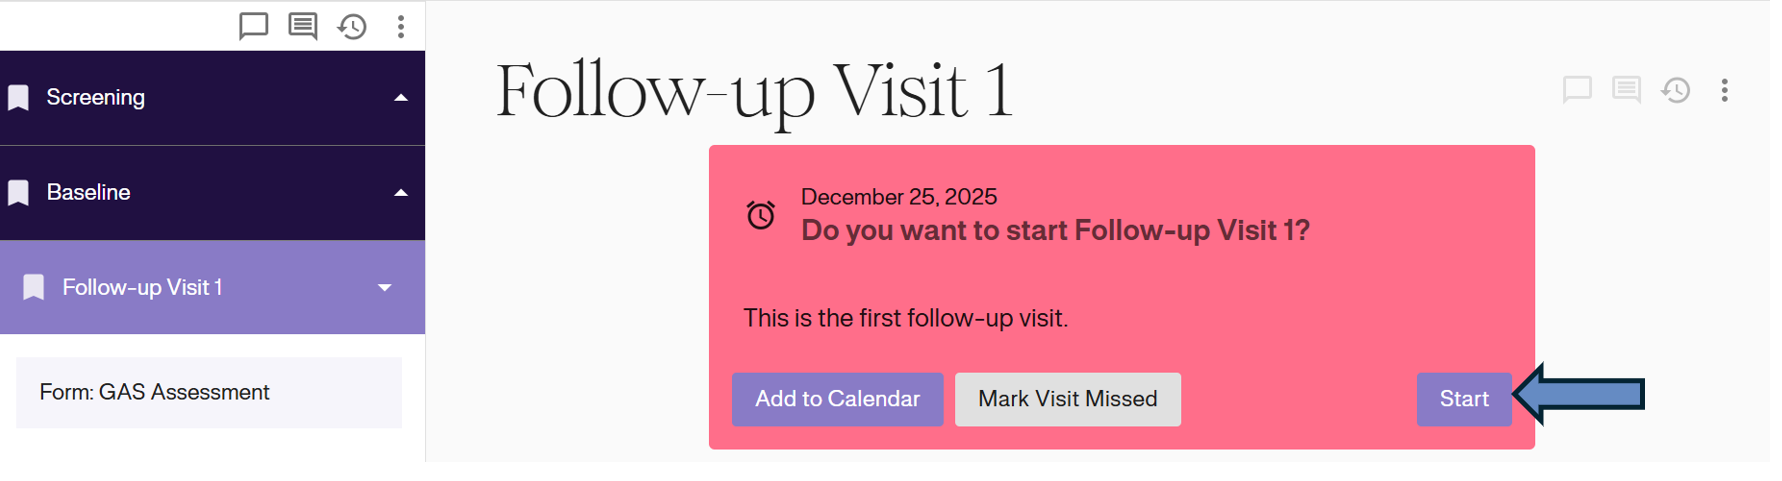
1. Click the correct visit in the left sidebar (for this example we will be using a baseline visit)

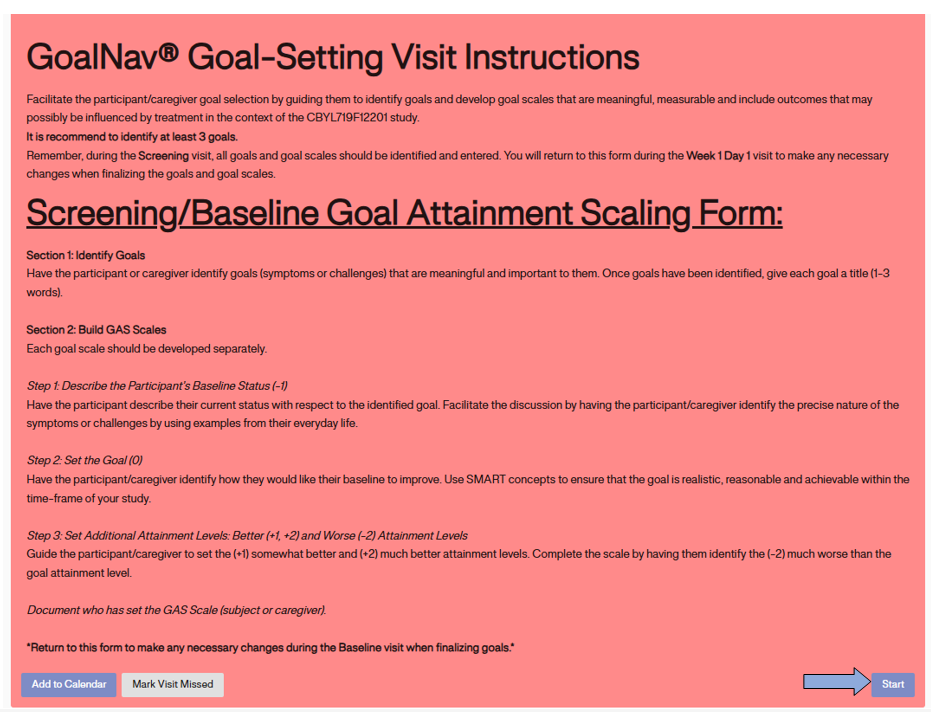
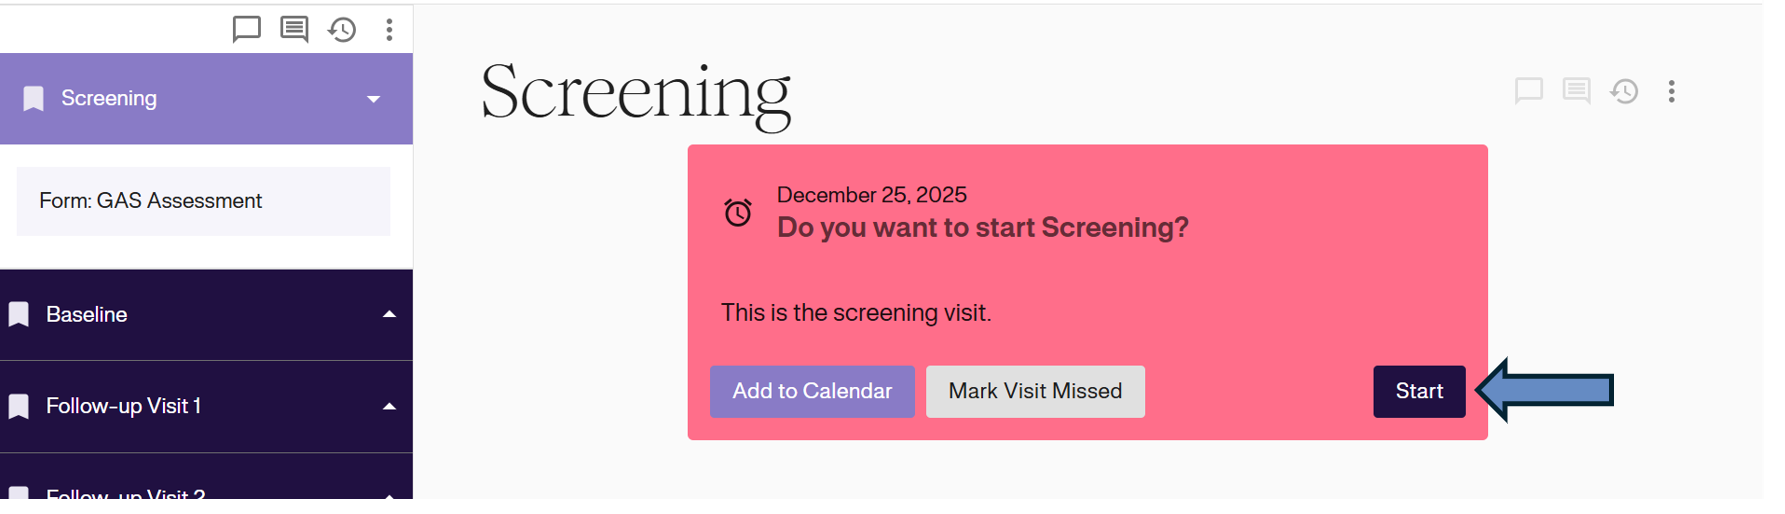
2. Click the start button in the main window. Within this window, you may be provided with visit instructions. This study is dependent on your instructions, and your specific details may vary.
3. Click Start
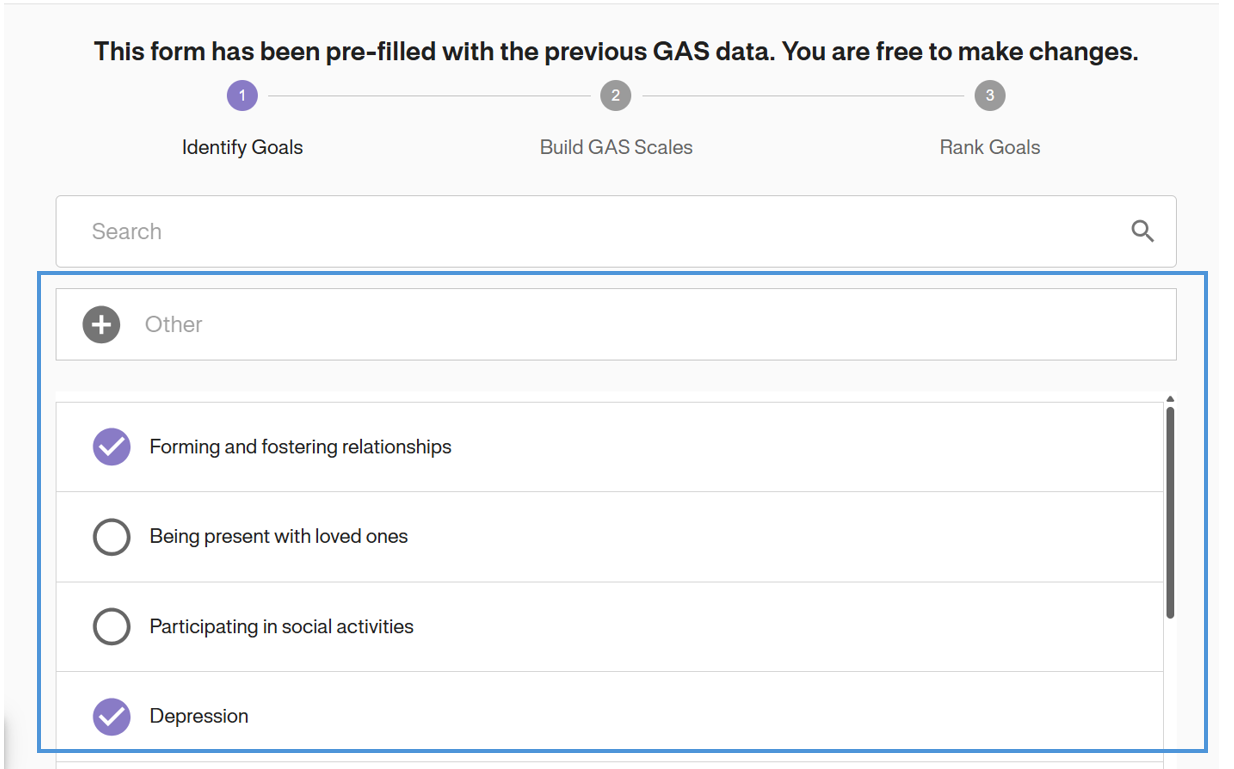
4. Once the visit has begun, you will be directed to the first step of the goal-setting process, which involves identifying your goals. The following instructions provide basic data entry guidance for completing the form and do not contain specific GAS instructions. All GAS-specific instructions for completing a GAS visit are outlined in your study-specific course.
Step 1: Identify Goals
Select the goal area. There are three ways to select or create a goal for the subject:
1. Search Goal Inventory: Use the Search bar at the top to find specific goals by keyword.
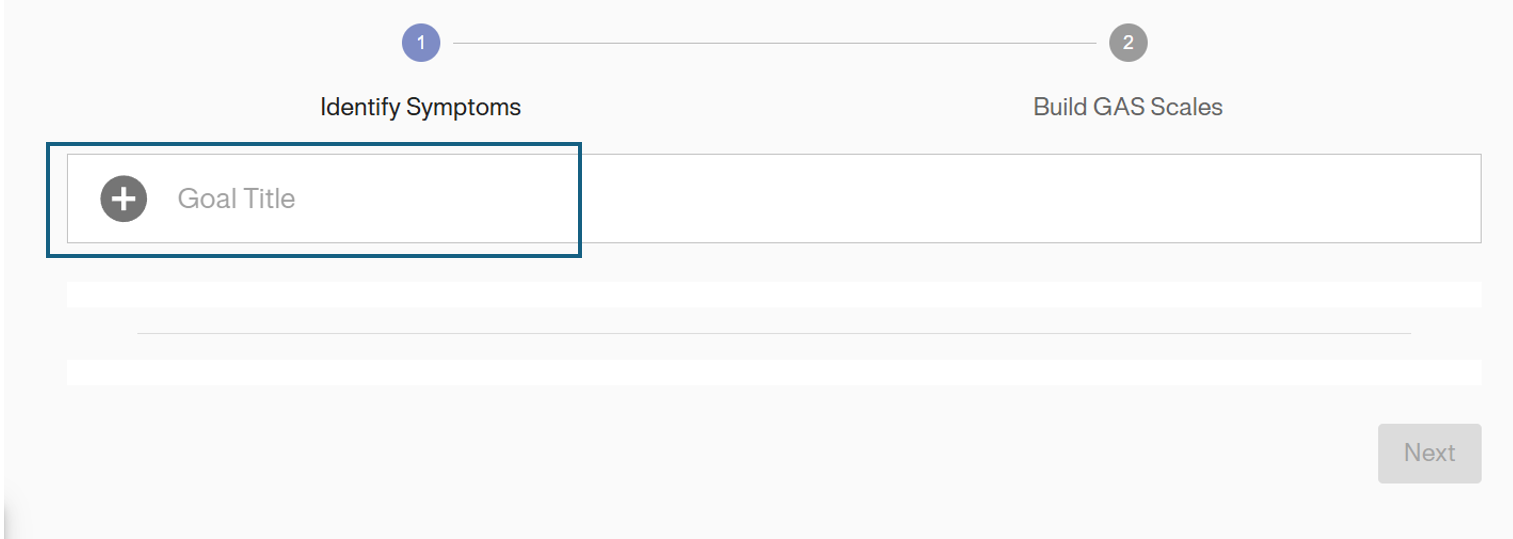
2. Create Custom Goal: If the goal is not found in the inventory, click the + Other button to manually enter a custom goal description.
3. Browse Goal Inventory: Scroll through the list of predefined goal categories (e.g., “Forming and fostering relationships”) and select the relevant goal area
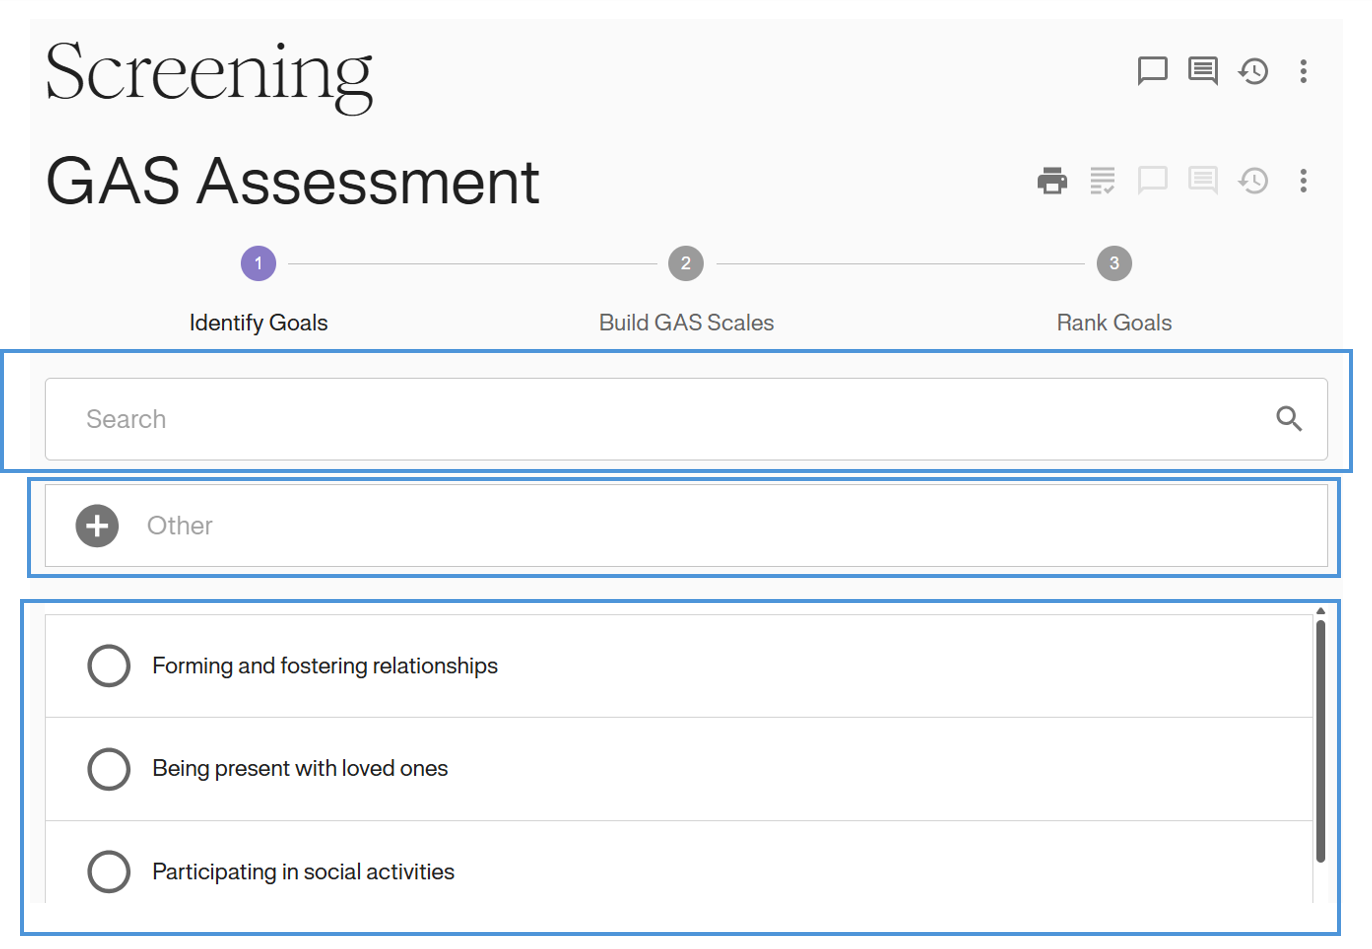
Studies vary in what methods are used to identify goals and your study may not include a goal inventory. In that case, you will be required to create custom goal titles only.
Selected goals will populate at the bottom of the form. Scroll to the bottom to review and confirm goals. If the goals are required to be changed, you must return to this screen to remove or add new goals. Remove goals by clicking on the red X.
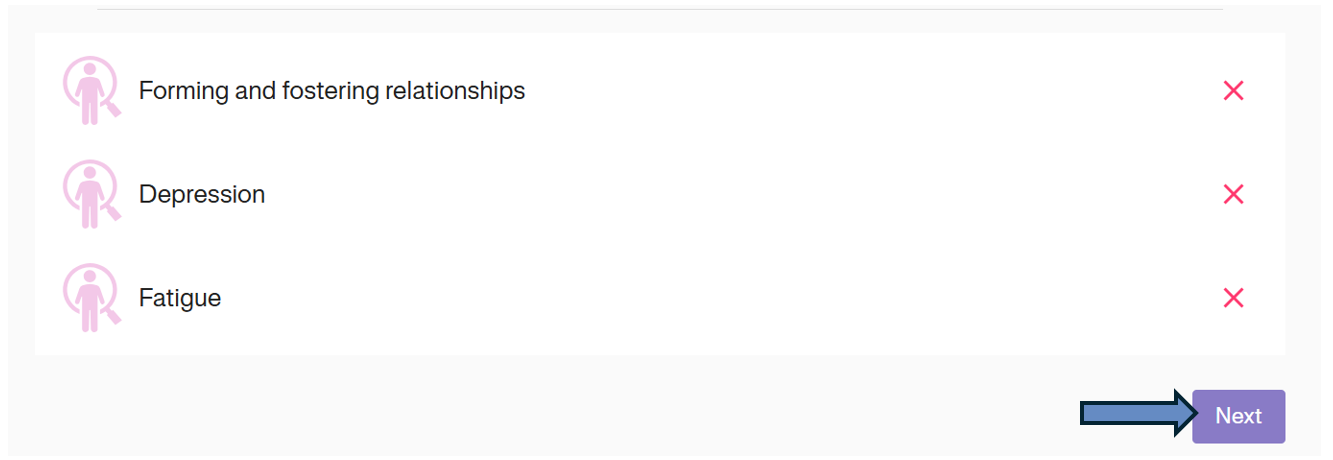
Click Next to proceed to build the GAS scales.
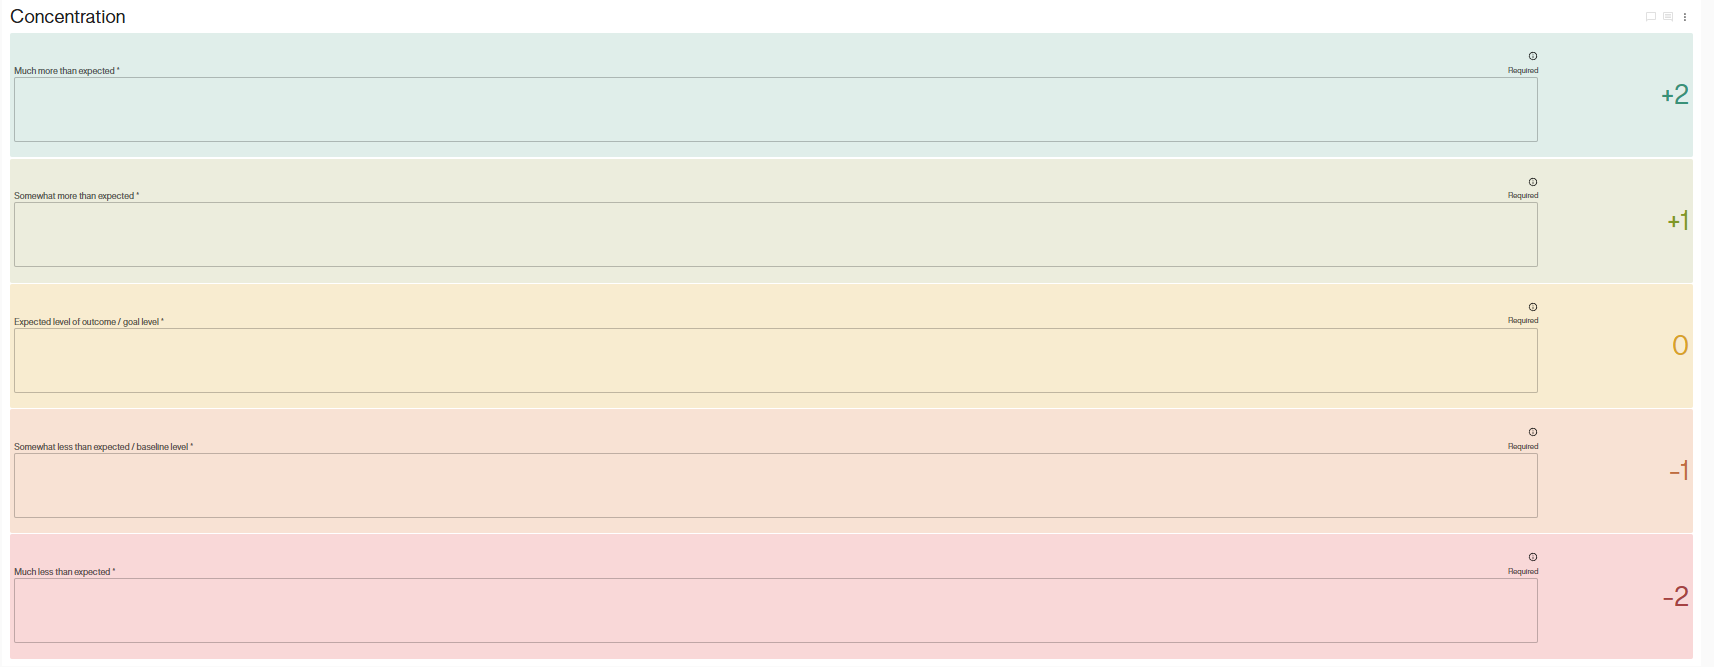
Step 2: Build GAS Scales
Develop the goal scales by entering the data into each level as instructed during the GAS training course.
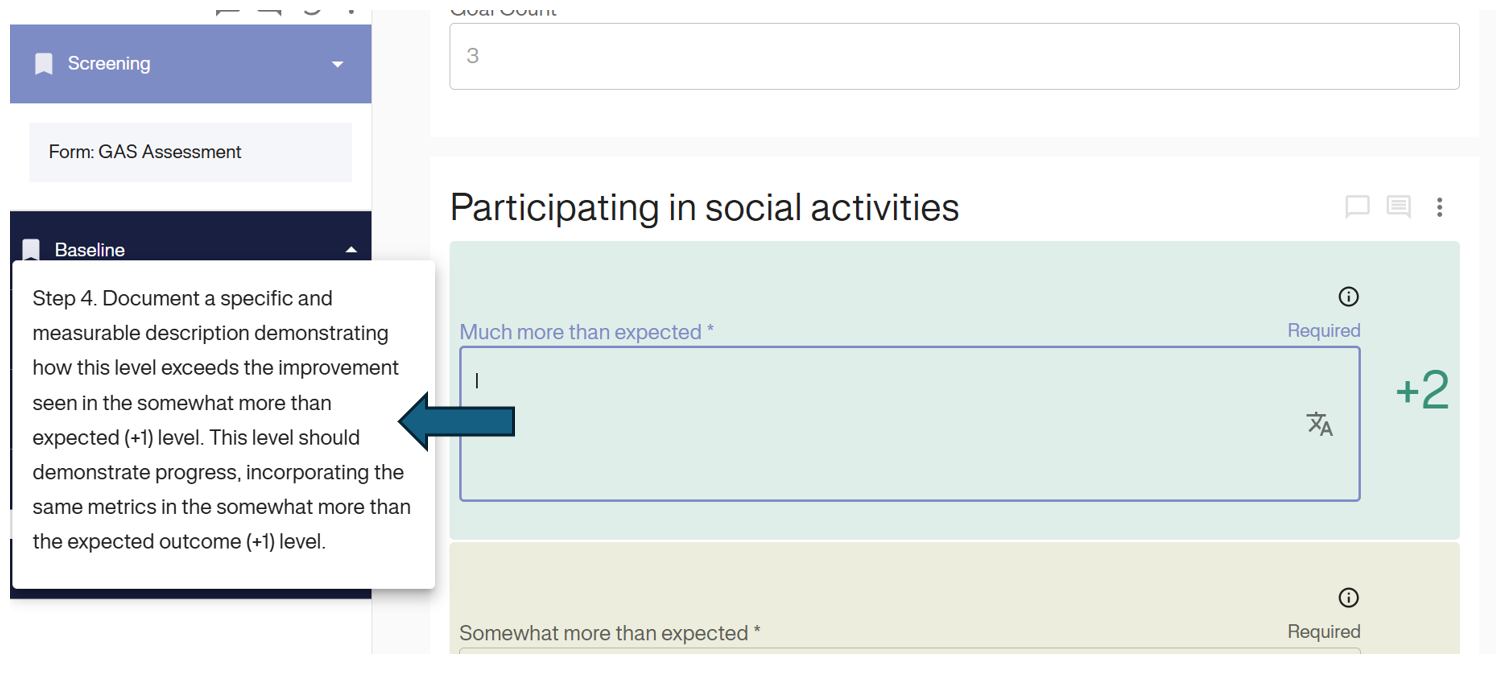
Intelligent GAS Guidance Tooltips
We have introduced a new assistive feature for Goal Attainment Scaling (GAS) entry to ensure scoring accuracy.
- Contextual Help: When you click inside any GAS scale description field (e.g., Much more than expected), a guidance tooltip automatically appears on the left side of the screen.
- Sticky Focus: This tooltip remains locked to the field even if you scroll up or down. This ensures the definitions and instructions stay visible while you type, preventing the need to scroll back and forth to check criteria.
Click Next to Proceed to the next step. Alternatively, if your study does not include the option to rank as a step in the goal-setting process, you will be instructed to click ‘Save’ at this point to save the form data.

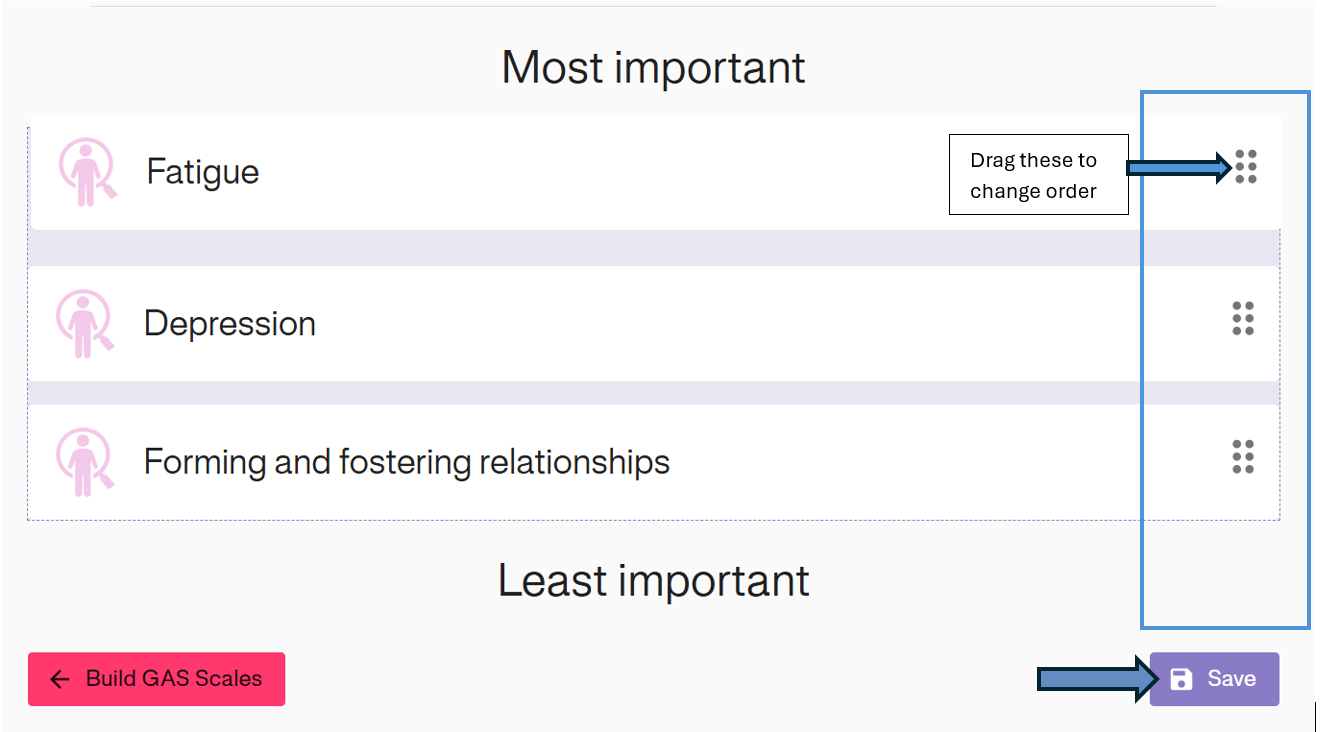
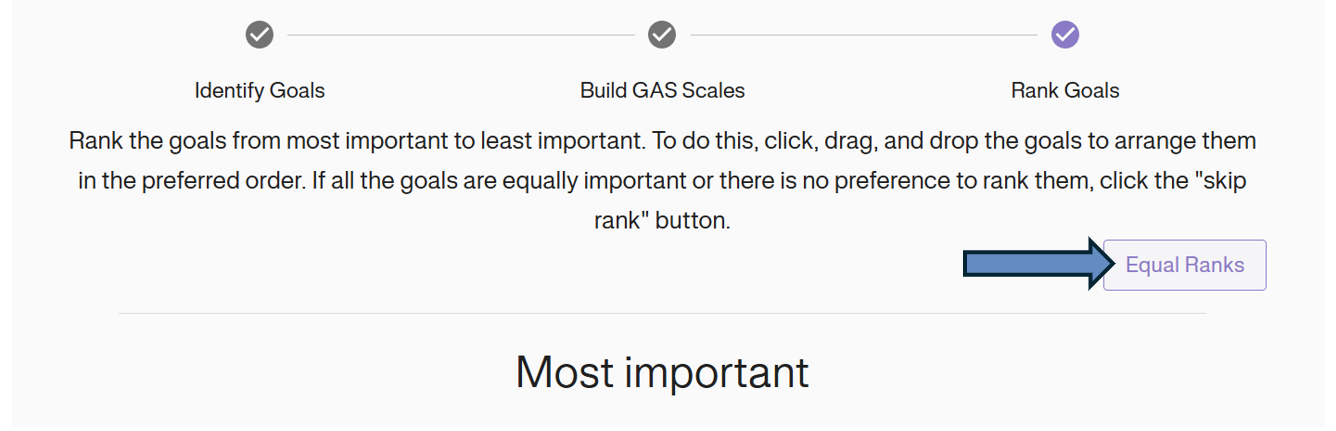
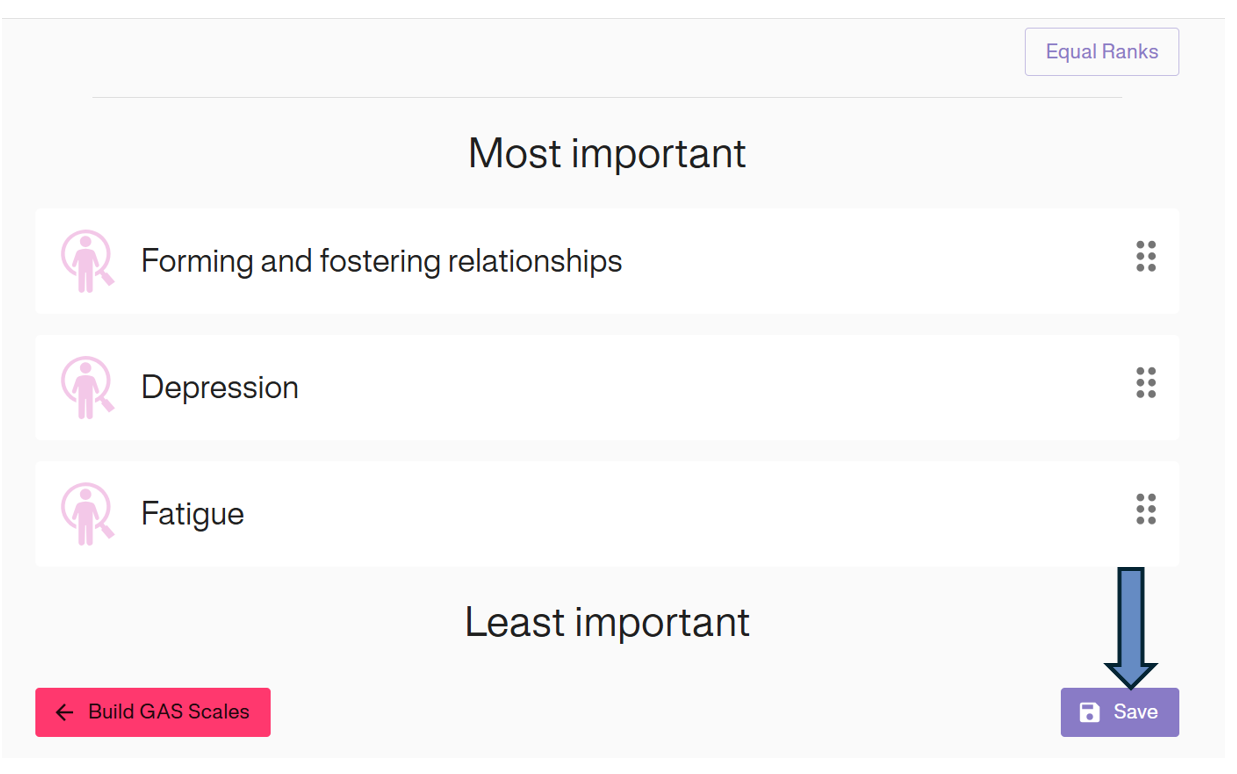
Step 3: Rank Goals (Study Dependent)
The last step in the goal-setting GAS assessment form is have the participant (or caregiver) rank goals from most important to least important.
Drag and drop based on the information received from the participant (or caregiver).
Some studies provide an option to provide equal ranks.
Not all studies include ranking as part of the goal-setting process and ranking will only be available in GoalNav if its required.
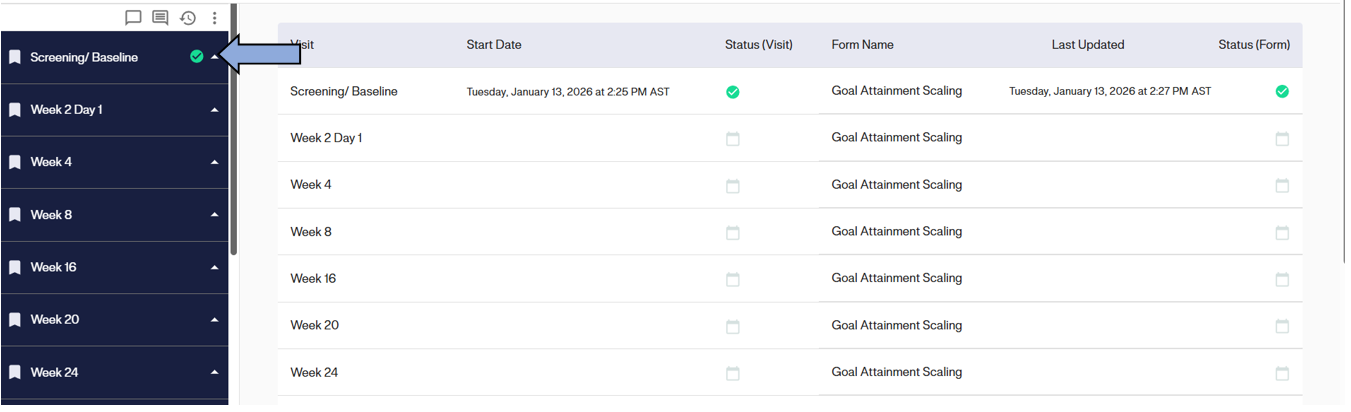
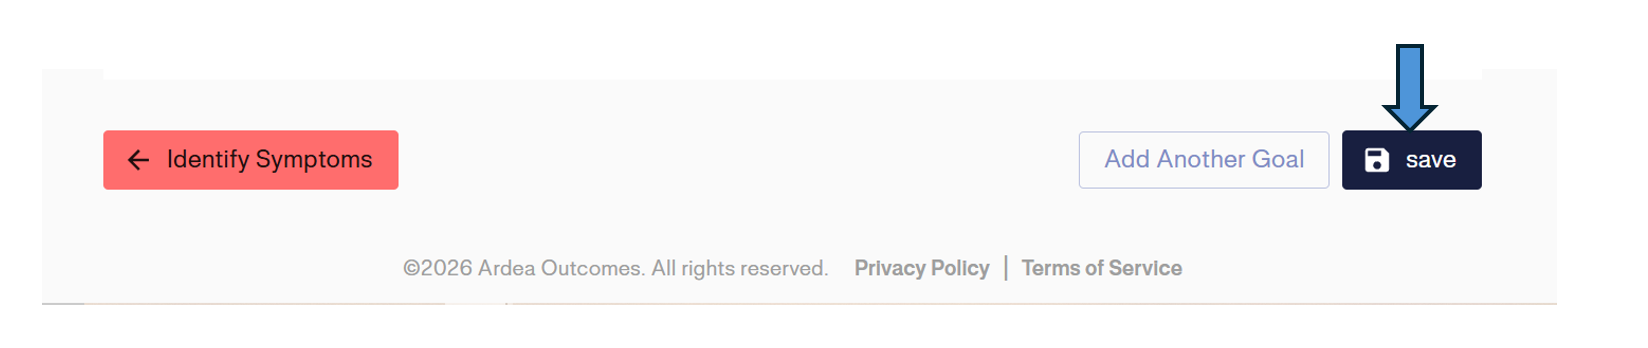
Once all goals have been appropriately ranked, click ‘Save’ to save the form data.
Confirm the data entry was successful by checking for the green Saved! Banner.

Once the visit is completed and saved, log out of GoalNav.
Step 4: Sign the Form or Visit
Sign the form or visit You may be required to sign the form or the visit as part of the visit data entry process. You will be informed of this requirement during your study specific training course. Please see Chapter 4: Data Entry - : Signatures for information on how to provide a signature within GoalNav.
Exceptions to the Goal-Setting GAS Assessment Form due to Visit Schedule
Completing the GAS Assessment Goal-Setting Form for a Combined Screening & Baseline Visits
Screening/Baseline Visit: 1. Select the screening/baseline visit from the left sidebar.
2. Review the visit training instructions and click Start.
3. Enter the data as per the previous instructions. (see Section 2). 4. Click ‘Save’ form. 5. Log out of GoalNav.
Making Changes to a Goal-Setting Form for a Combined Screening & Baseline Visit
When returning to GoalNav to complete the baseline visit, follow the instructions below:
Baseline Visit: Select the same screening/baseline visit from the left sidebar
1. Choose already saved visit: Select the Screening/Baseline visit from the left sidebar and click Start.
2. Change: Update any data required as per the interview during the baseline goal-setting visit. You can toggle back and forth between all the steps of the goal-setting GAS form to make any changes. For example, you can add, remove or modify goals or goal scales. You can also re-rank goals if required Goal scales should be finalized during the baseline visit. (see Section __ for details on each section of the GAS form)
3. Reason: You will be prompted to enter a Reason for Edit. Enter the reason (e.g., “Updated during Baseline”).
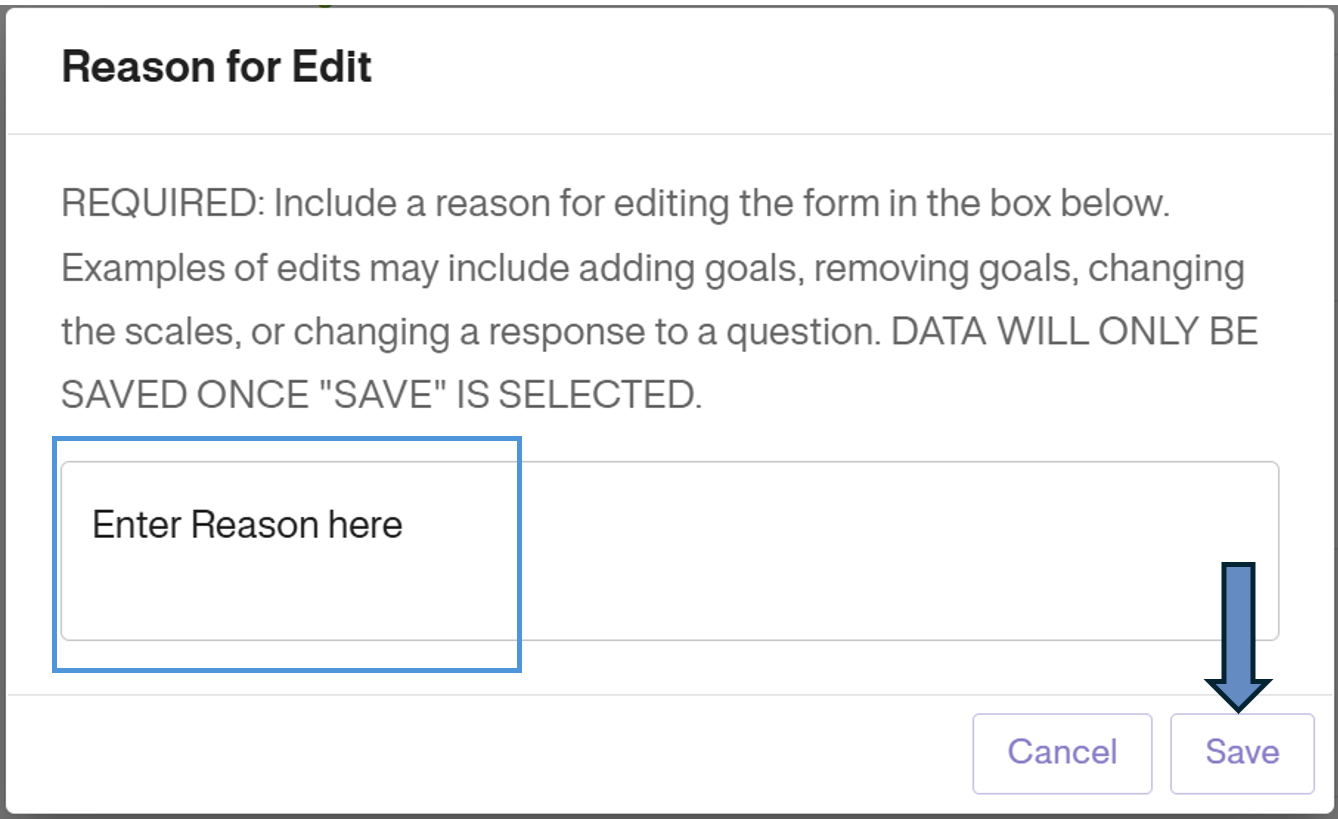
4. Save: Click Save to finalize the changes.
Completing the GAS Assessment Goal-Setting Form for Separate Screening & Baseline Visits
Completing the Goal-Setting GAS Form for the Screening visit 1. Select the Screening visit from the left sidebar.
2. Review the screening visit training instructions. Click Start.
3. Enter the data as per the previous instructions. (see Section 2).
4. Click ‘Save’ form.
5. Sign form or visit if required. 6. Log out of GoalNav.
Completing the Goal-Setting GAS form for the Baseline visit 1. Select the Baseline visit from the left sidebar.
2. Review the Baseline visit training instructions. Click Start.
3. The data from the screening visit will be pre-populated into the Baseline visit. Update any data required as per the interview during the baseline goal-setting visit. For example, you can add, remove or modify goals or goal scales. You can also re-rank goals if required. Goal scales should be finalized during the baseline visit. (see Section 2).
4. Click ‘Save’ form.
5. Sign form or visit if required. 6. Log out of GoalNav.
Completing GAS Assessment Rating Forms during Follow-up Visits
The GAS Assessment Form for Rating Goal Attainment during Follow-up Visit should be completed as follows. Please note that each follow-up GAS assessment form will be displayed in the same way for any follow-up visits scheduled for a study.
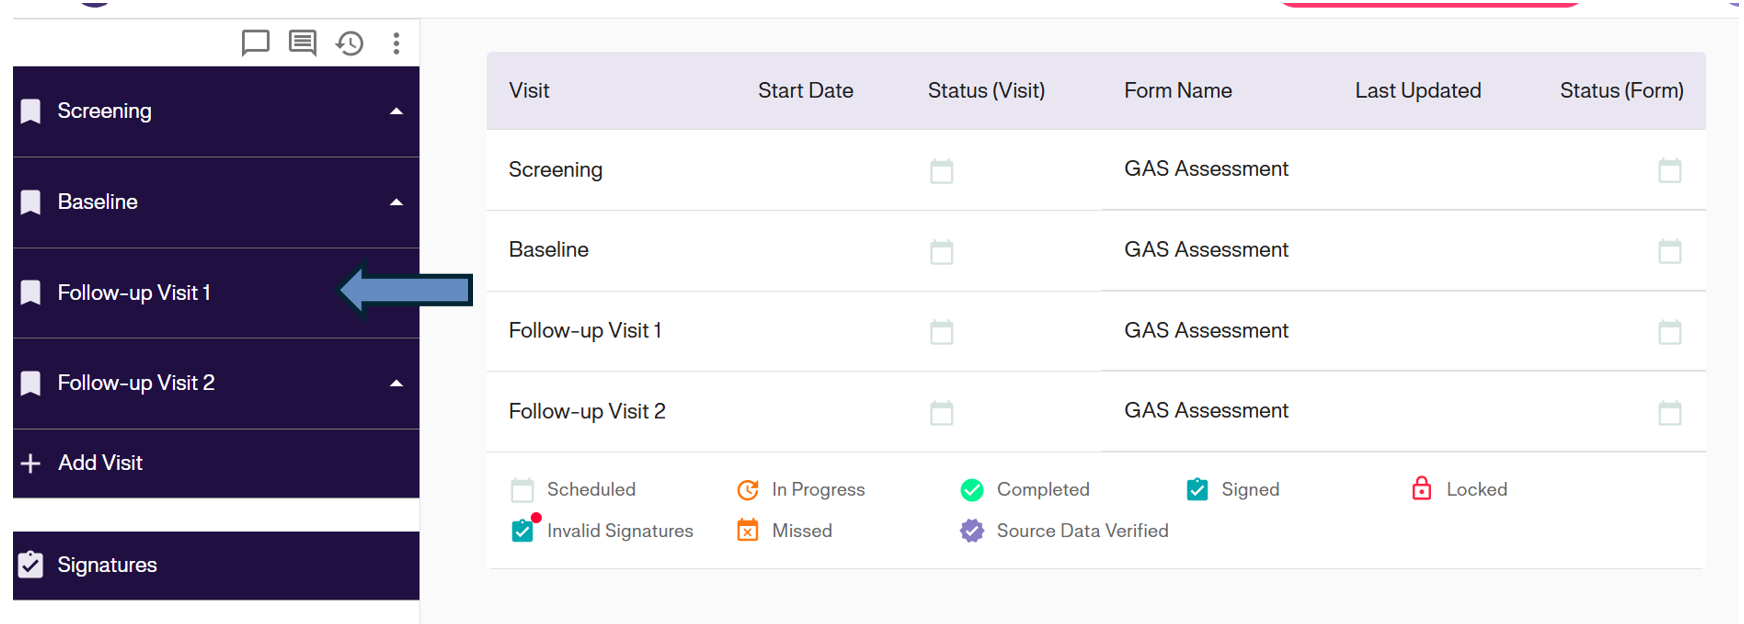
1. Click on follow-up visit from the left-sidebar, read the instructions and click on start button.
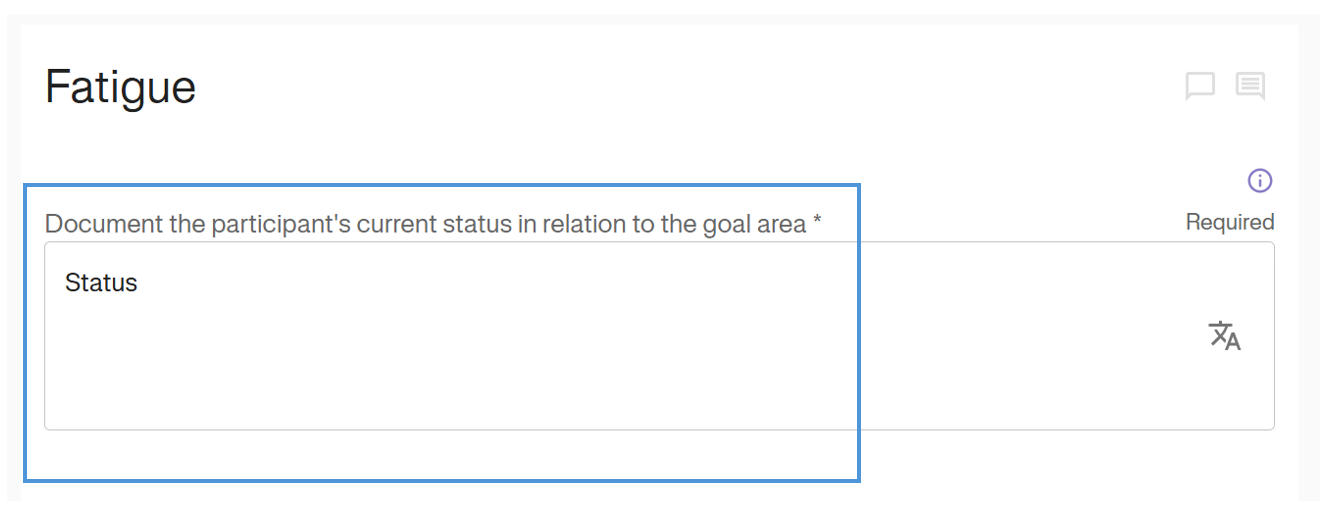
2. Start by documenting the Subject’s Current Status description in relation to the goal area.
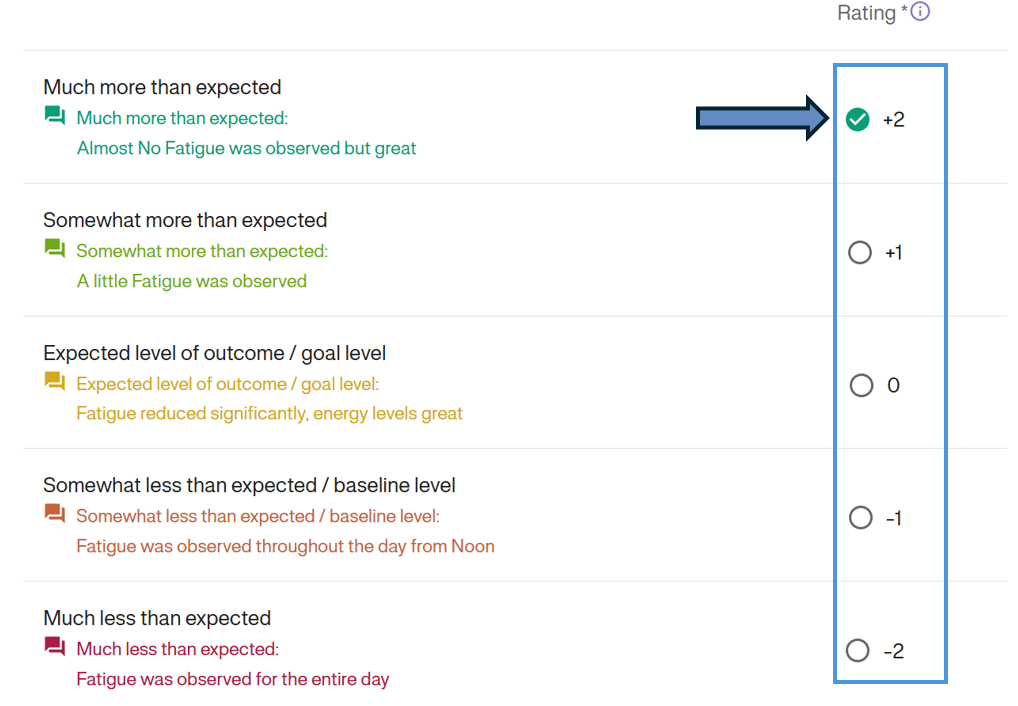
3. Document the goal attainment rating using the radio button that corresponds to the provided rating. Depending on your study, you may have two columns for ratings - one for the participant or caregiver and one for the clinician. Ensure you are providing the correct rating in the correct column.
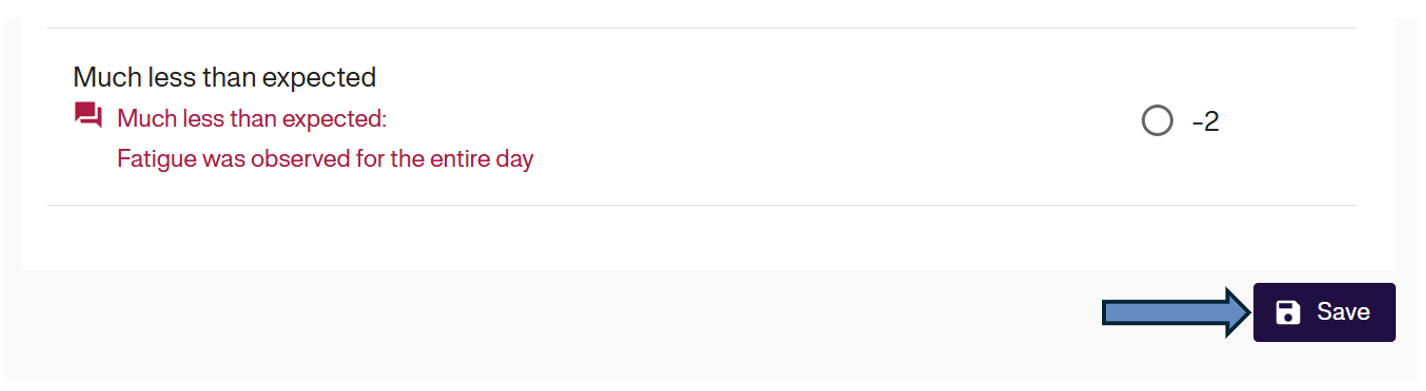
4. Click ‘Save’.
5. Sign form or visit if required. 6. Log out of GoalNav.
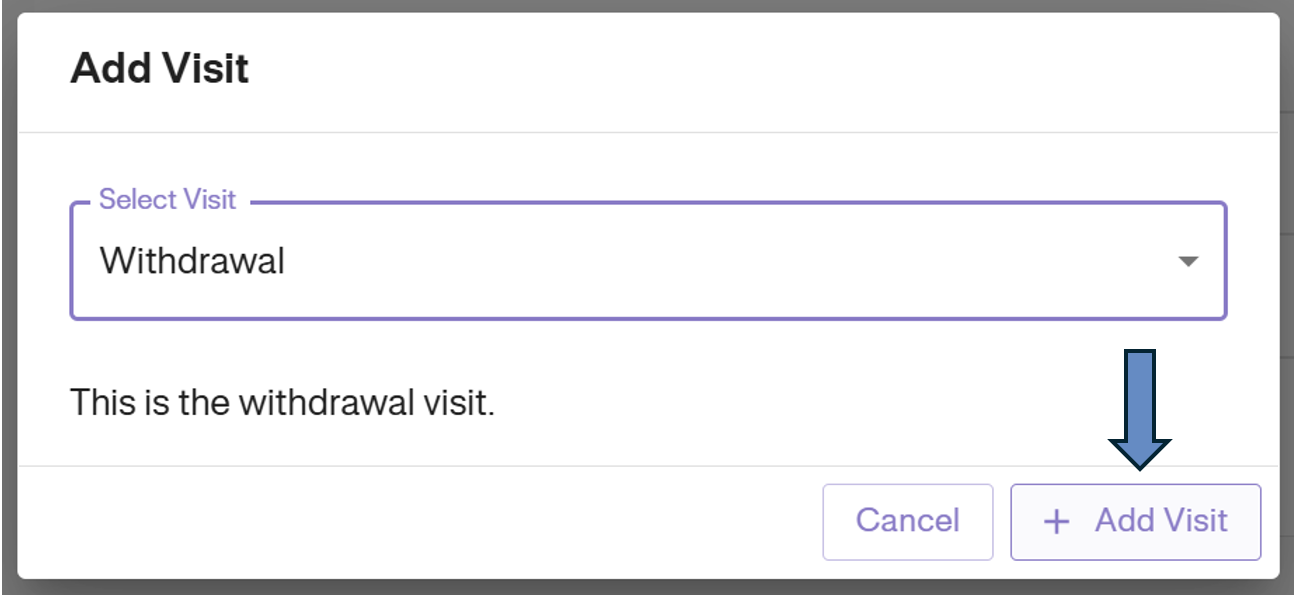
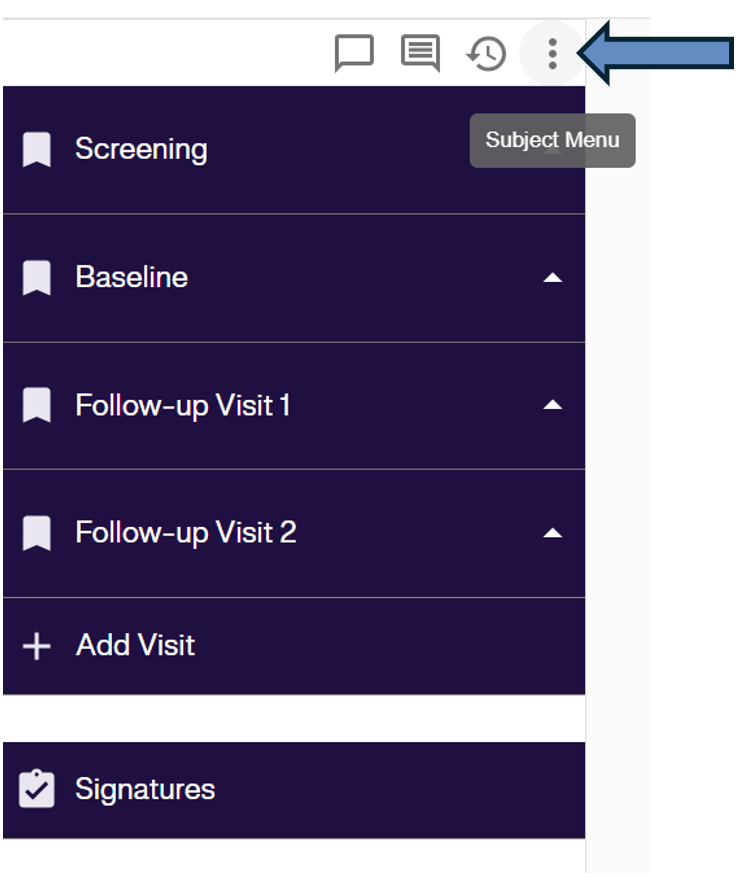
Unscheduled Visits (e.g., Withdrawal)
Note: Based on study configuration the unscheduled visits options may vary, we have shown withdrawal for example only.
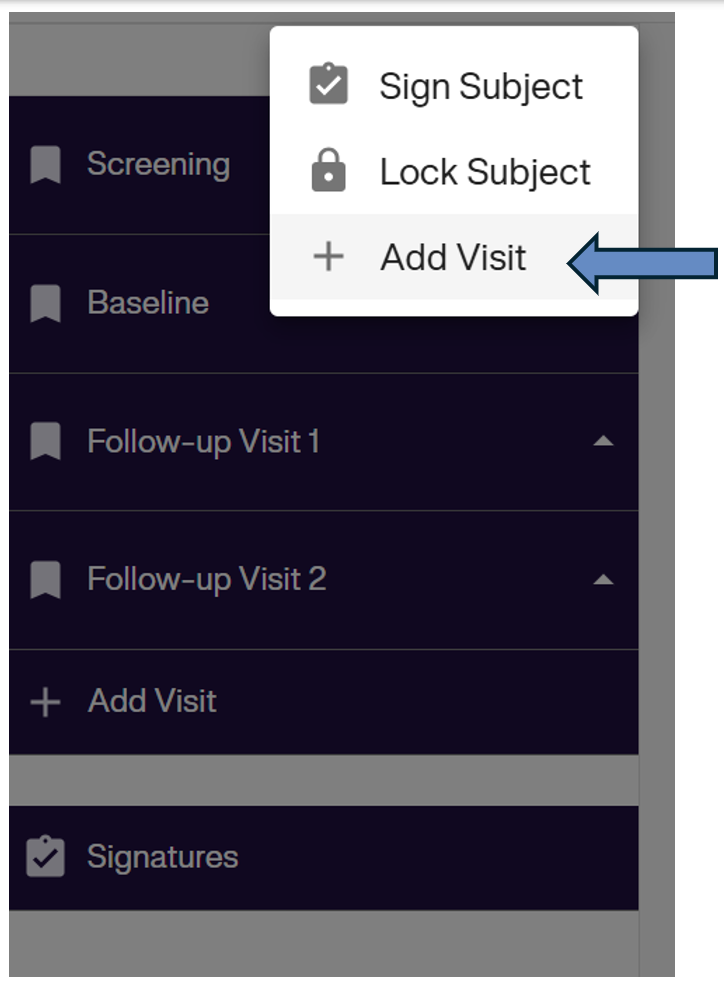
To add an unscheduled visit: 1. Click the 3-dot icon (Subject Menu) at the top of the sidebar.
2. Select Add Visit from the dropdown menu.
3. Choose the visit type (e.g., Withdrawal) from the list.
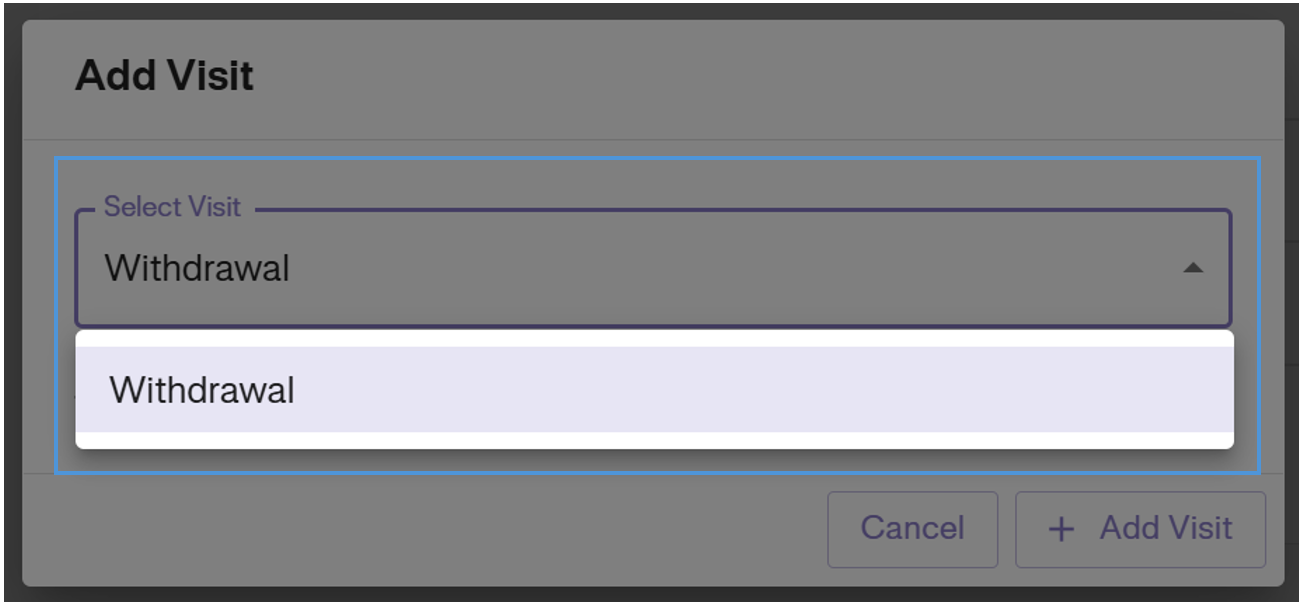
4. Click Add Visit to confirm.